Wish everyone a very

Greetings!
|
These are clay faces I made and painted.  |
After the zipper is in place the texture is applied.  |
|
 |
And a close up of the texture.  |


|
Human Eyeballs  |
Here is looking at you  |
|
A handmade glass eye for the stopper  |
Pickled Mice  |
|
A mouse bead I bought when I was in Japan  |
Werewolf Fangs. The fur is coyote fur but who will know the difference? LOL  |
|
Because poison comes in the prettiest bottles.  |
The stopper is a hand blown glass bead with a black diamond crystal on top of that.  |
|
Well the camera was at a tilt for this photo. Magix Spell.  |
I covered the bottle with patina paste. I do like the effect.  |

Hi Everyone!
Since most of the US is in disastrous weather conditions where millions of people are without power, I hope you will be able to read this post. For us it is below 0 and very windy. The rest of the state is in ice, snow, wind and under emergency conditions. Let me know if you are in a storm.
Over the last few weeks I have had several requests on how to add a face to a bottle. There are many ways to accomplish this, I am going to show you 2 of them. The idea is to make the face, or any other object placed on the bottle to look like it is part of the design and not just glued on, the piece has to be and look cohesive. These are the two I created for this post and serves as my FFO. I will give instructions below.
|
 |
 |
|
This is my personal bottle and holds patchouli oil.  |
 |
I have to tell you that a lot of my photos didn't turn out. However, I think you will still be able to create your own bottles with this information. Click on the photos to see them closer.
|
I used a resin cabochon for this bottle. But you can use anything to decorate a bottle. If you use a stone or glass you must back them with felt. Stone and glass will not adhere to a glass bottle. Well it will but then fall off.  |
I love this bottle with a smooth top and ridges on the bottom. I spray painted it black. As much as I hate using hot glue, it is the best type of glue to adhere with for bottles, and it is much faster.  |
|
I used air dry clay to make a bezel around the cab. However, you can use just about anything. Such as twine or ribbon. Anything goes. If you do use clay lay a line of white glue to adhere the clay as it dries. 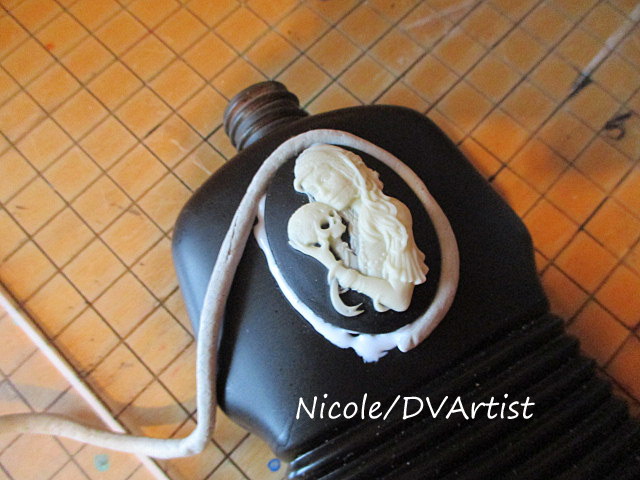 |
Once the clay is laid in, make some sort of design on it. Any type of tool will work. Even a tooth pick.  |
|
Once the clay is dry, it's time to make texture. This is the same method for corpsing skulls. See the instructions here. It is simple water and glue and tamp in paper towel, toilet tissue, fabric, netting, or any other material to make texture.  |
I used paper towel. Make sure to get a close fit around the clay. Allow the first layer to dry then add another and another until you are happy with the texture. |
|
 |
Here's where the photos didn't turn out. Once everything is dry, you want to paint. I took gold paste paint and with my finger lightly ran it over all the edges on the bottle and texture. Then I used red acrylic and dabbed all the white space and the clay around the cab. One last go over with the gold paste paint and it is done. You can use any kind of paint, colors, pens, what ever you want. |
|
I am using clay faces I already had made.  |
The backs needed to be flattened to fit better in the bottle. If you make a clay face place it on the bottle to get the proper curve.  |
|
I had already started this bottle and changed it up for today. Hot glue the faces onto the bottle.  |
Make sure to go under and around the faces with the hot glue.  |
|
Make sure there are no gaps. Then continue making random designs with the hot glue all over the bottle. The thicker the better.  |
Time to paint. I started with bright copper shinny paint on all of the dried glue.
 |
|
Once that is dry tap in a color onto the glass. I used a white acrylic.  |
With a very lightly damp paper towel, tap the paint to remove and make it look mottled.  |
|
When the entire bottle is done and dry go over the paint on the glue. Just to brighten it up.  |
Paint and highlight the faces.  |
|
|
|

I am also linking up with Gillena
I want to wish all of you a very happy holiday how ever you celebrate.
Nicole
Now it's your turn, show me your face.
